
Deploy Office 365, LTSC 2021, Office 2019 using ODT
Ref: Overview
of the Office Deployment Tool - Deploy Office | Microsoft Docs
Office Deployment Tool (ODT)
The office deployment toolkit is a command-line tool that
you can use to download and deploy Microsoft 365 Apps to the client computer.
Ref: Download
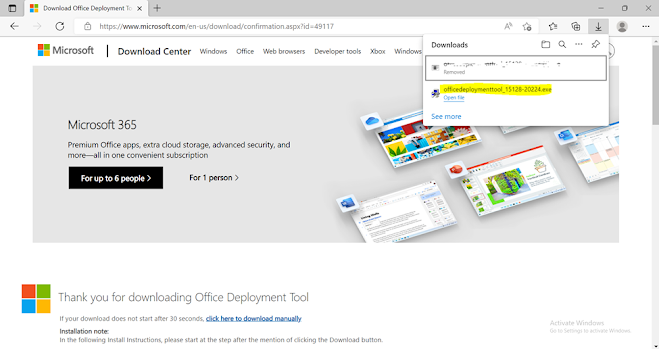
Office Deployment Tool from Official Microsoft Download Center
Download the ODT from above link. After downloading you are
required to run the .exe file which contains the "Setup.exe" and "Configuration.xml"
Getting start with Office Deployment Tool (ODT)
Step 1. Download the file from the above link. You can check the
system requirements and the other details while downloading.


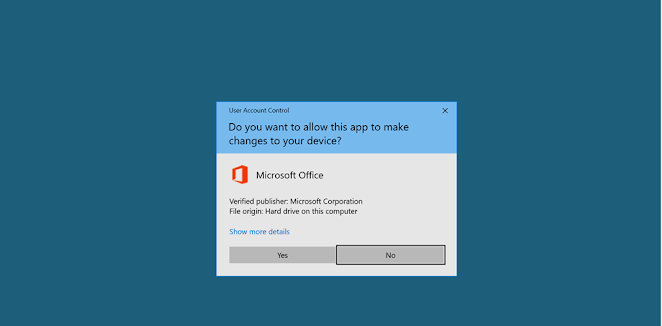
Step 4. You will be prompted to select “Yes” or “No”. Click on “Yes”

Step 5. Accept the Microsoft Software License Terms and Continue

Step 6. You are now asked to select the folder to save the
extracted files

For this demo, I have created a file named M365 Installer in
C: Drive

Step 7. Once you click “OK”. You will receive a notification that
the file has been extracted successfully in the specific folder.


You can see the setup file and the XML files with different
versions. The XML files can be used as to download the application. For example, If I need
to install 64 Bit Office365 Enterprise Application then I can use the first XML file with named “Configuration-Office365-x64”.
If you want more customization in the XML, then you can proceed with the customization
tool. Below is the link for the customization tool.
Ref: Microsoft 365 Apps admin center (office.com)
Note: Below steps are for the creation of customized XML
A. Open above link and click on "Create a new configuration".


C. You can select the specific office suites product as per
the requirements

For this demo I am going to choose Office 365 Apps for enterprise

D. If you want to install “Visio”, “Project” you can also
select the available options but for this demo I am selecting none.
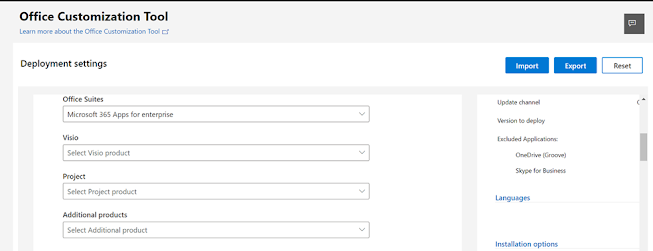
E. For update channels and version, leave as default or you
can change as per the requirements.

F. Turn on the app that you want to deploy as per your
requirement

G. Turn on or off and click on Next

H. Select the languages as per your requirements and click
on Next

I. Choose “Office CDN” or “Local source”

J. You can turn on or off the below settings and click on
Next

K. By default, all the setting is turned on. If you turn on these
settings, then the previous version of office along with Visio and Project will
be uninstalled. In most of the cases the Visio and Project comes with separate
licenses thus you need to decide if you want to uninstall the office only or uninstall
including Visio and Project.

For this demo, I have turned on the Uninstall any MSI
version of office but turned of all other settings which will uninstall the
office products except Visio, Project, SharePoint Designer, and InfoPath.

L. Click on next

M. Turn on the EULA (End User License Agreement)

N. Product Activation is user based for "O365 Apss for Enterprise" and click on Next


Now you are required to go through two steps
1.Download the Microsoft 365 Apps product based on the XML that
you created.
2.Install the downloaded Microsoft 365 Apps


Step 10.Change the current directory path to the directory where
the setup and XML files are located. Use the below command:
C:\windows\system32>cd c:\M365Installer

To download use the script below
C:\M365Installer>Setup.exe /download configuration.xml

After pressing enter you will now be able to see the folder named
“Office” which is being downloading according to the customized configuration.

You can also see the bandwidth consumption from the task
manager. It will take time to download depending on your network speed. (Approx.
size of file is around 3.18 GB)

Once the download is complete, the cursor will reach on C:\M365Installer>_

Step 12. You can now proceed with the installation process. Use
the below command to install with the XML file.
C:\M365Installer>Setup.exe /configure configuration.xml

13. Soon after you press enter key, you will be prompted to
select "Yes" or "No". Click on Yes
After few seconds, you will see the things are getting ready
and in the process of installation.


Step 14. You are now required to Activate the Product with your email address which are assigned with enterprise license.


Follow the below article to deploy Office 2019 & LTSC
2021 with the available Multiple Activation Key (MAK) & Key management
Services (KMS)
Deploy
Office LTSC 2021 - Deploy Office | Microsoft Docs
Deploy Office 2019 (for IT Pros) - Deploy Office | Microsoft Docs