
Add Custom Domain
A unique name that appears after the @ sign in the email address and after www. In the web address is known to be a domain. Normally, the domain is start with the company name and ends with the internet suffix. For example, prakashchhetry.com.np
Using the custom domain like “info@prakashchhetry.cloudns.nz” with M365 can help in building the credibility and recognition for your brand.
For this demonstration, I have a domain named “prakashchhety.cloudns.nz” hosted in “cloudns”. Let’s learn on how add the customized domain in your Microsoft 365 account.

In the admin center, when clicking on domain you will see the default “onmicrosoft.com” domain. This is the domain which was created during the signup procedure.Click on “+ Add domain” to add customized domain to Microsoft 365.

Enter the “Domain name”

Here, I have added the domain that I want to add to my M365 account. In your case you have to enter the domain of your choice.

Choose to add the TXT records by selecting any of the below methods and click “Continue”

After continuing the above process, it will automatically detect who the DNS Hosting provider is, and generates the records. Now, before verifying you are required to add the generated records to the DNS zone. Here in this demonstration since the domain “prakashchhetry.cloudns.nz” is hosted in “cloudns”, we will add the records on it.

Click on “Add New Record”.

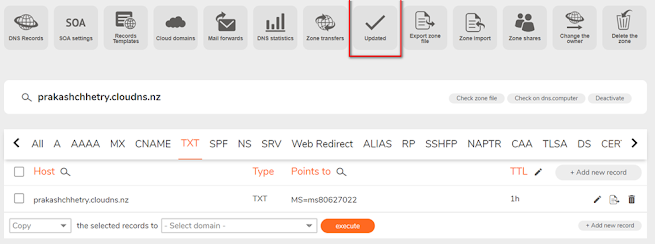
Choose Type= “TXT”, TTL=3600 and add the records copied from 365 portal and click on “Save”.

Based on the DNS hosting provider, it will take some time to update

The record is now updated.
Now, lets continue the steps in Microsoft 365 by clicking “Verify”

The domain has been verified and its loading. Adding the TXT records will verify the domain ownership.

Domain is already verified and added to your DNS Zone. Now, if you want the domain for email services then you will again have to add certain records to the DNS Zone, for that, click on “Continue”.

The records that need to be added on the DNS Zone is now created. Also, you are provided with the guidance on where the domain is located and where the records has to be updated.

On scrolling down, you will see these records. Add all these records to DNS Zone and click on continue.

Lets first add the “TXT Records” and see what happens after adding the records.

Now the record is updated

Now, on hitting continue button, the green icon shown that the records have been matched as expected but the two records MX and CNAME do not match as expected because these records are yet to be added.

Let's add both the records.


Now, lets hit on “Continue” and check what happens.

On hitting continue, Microsoft 365 checks if the DNS added in the DNS Zone matches the generated records or not.

All the records have been verified and the setup has been completed. Click on “Done”.

Now, on checking domain, you will see the default domain and the customized domain.
